


Water kefir grains photo from Adobe Stock
Kefir is probably the parent of all yogurts. You can make it only using live or freeze-dried kefir grains, which are lumpy colonies of probiotic bacteria and yeasts. (The milk-based ones look like wet popcorn puffs.) All of these stem from an original mother culture, so you must obtain them from someone who cultures kefir. High-quality dried kefir starter can be ordered from the Body Ecology online store. Live kefir grains are available from a few retail sources and individual sellers on the Internet. Two of these, which I have not tried and cannot vouch for personally, are Wildly Organic and GEM Cultures, Inc. Also, there are active kefir sellers and traders on eBay and in Yahoo Groups. You could also check with your local health food store.
Kefir is cultured at room temperature for about 24 to 48 hours. You can make it in any nonmetallic container, such as a glass jar or clay crock. You will also need a strainer (preferably plastic rather than metal), a nonmetallic spoon, and another container to store the finished kefir in the refrigerator. Everything should be thoroughly washed prior to use. Since kefir grains are sensitive to ultraviolet (UV) light, it is best to put the kefir container in a cabinet, unused oven, or other dark place. To get started, fill the jar about three-fourths full with milk. If you are using dried kefir culture, follow the directions on the box. If you have live kefir grains as your culture, then gently drop a spoonful or two into the milk. One tablespoon will culture about 8 to 16 ounces of milk; using more may increase the sourness. Cover the container loosely with a lid or towel. In 24 hours, the kefir will be a thin, mild beverage with a sourdough-like taste that is similar to yogurt. For a thick, sour kefir, allow it to ferment for 48 hours at room temperature. Using a yogurt maker or warm oven to accelerate the biological activity is not recommended with kefir, as it can throw off the natural balance of the organisms.
When the kefir is sour enough for your taste, it is time to strain out the grains from the kefir liquid. Using a strainer over another container or glass, pour out the kefir and make sure that all the grains have reached the strainer. These grains can be placed immediately into some new milk for the next batch of kefir. If you want to store them instead, put them in a covered cup of milk in the refrigerator, and continue to refresh the milk every few days. They will stay fresh this way for up to two weeks. If you keep these grains alive and well fed, either through continuous use or by alternating storage and use, then you will never again need to buy new kefir culture.
Kefir grains can be used to culture goat’s milk, soy milk, fruit juice, and sugar water as well. For soy milk or goat’s milk, just follow the same directions as for regular milk, but make sure to add a teaspoon or so of sugar, molasses, or maple syrup to the soy milk, just as you would in making soy yogurt. Honey has a mild antibiotic effect due to plant resins that the bees collect, so it is not ideal for fermentation use. (If you like the taste and health benefits of honey, you could certainly sweeten your yogurt with it after fermentation.)
If you want to make juice- or water-based kefir, then you should obtain some kefir grains that have been developed for this purpose. So-called “water kefir” grains are widely available from the sources listed above, and they will ferment effectively using plant sugars rather than the sugars found in milk. You can make a great brewed soda pop or ginger beer using a tablespoon of kefir grains in sixteen ounces of filtered (chlorine-free) water in a jar. As a general rule, I use about the same amount of sweetener as kefir grains, so a tablespoon or so of sugar, maple syrup, or molasses will suffice. Adding a pinch each of sea salt and baking soda will ensure that the organisms also have some mineralization. Finally, I cut in some fresh, peeled ginger slices and/or a little fruit for flavor. A slice of apricot, peach, fig, lemon, cucumber, or a couple of berries add a great flavor twist. To keep the kefir grains pure, you can suspend your fruit or ginger in the water using a cloth bag or unbleached coffee filter. Before setting the jar to ferment, lightly shake it so that a few oxygen bubbles get into the water. For a naturally carbonated, champagne-like beverage, close the lid tightly. For no carbonation, cover the jar loosely. Let it sit for 24 hours, or up to 48 hours for a sour version. For a slightly (1 to 3 percent) alcoholic drink, use extra sugar, keep the lid on tightly, let it ferment for about 48 hours in a warm, dark place, and lightly shake it a few times during this period. If the taste is too sour for you, add a little sugar before you drink it. To reduce the alcohol content of kefir, keep the lid covered very loosely and do not shake during fermentation. The regular alcohol content of water kefir is less than 0.5 percent (milk kefir is lower still), and for those concerned about children consuming kefir, this has been a common practice for many hundreds (probably thousands) of years in Central Asia, with no ill effects.
Soymilk kefir fermenting in a clay pot (left). Yogurt jars in a yogurt maker (right). Photo by R.J. Ruppenthal.
Making Yogurt or Kefir Cheese
You can make a spreadable cheese (resembling cream cheese or sour cream) from either yogurt or kefir. You will notice that when you make either yogurt or kefir, it becomes more solid and sour the longer you let it ferment. Make sure to start the cheese with some mature yogurt or kefir, not the particularly runny stuff; give it a few extra hours of fermentation time for good measure.
- A few ounces of strong yogurt or kefir
- Large glass jar, measuring beaker, bowl, or clay pot
- One square of cheesecloth or large coffee filter
- Strainer that fits over this container or an extra-large piece of cheesecloth
- Large rubber band or twine
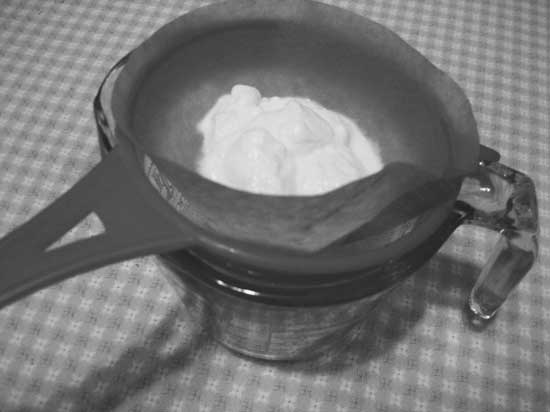
Making yogurt cheese using a coffee filter, strainer, and glass pitcher. Over a day or two, the whey liquid will separate and drain to the bottom, leaving a rich and healthy cream cheese/sour cream substitute on top. Photo by R.J. Ruppenthal.
Books on container gardening have been wildly popular with urban and suburban readers, but until now, there has been no comprehensive “how-to” guide for growing fresh food in the absence of open land. Fresh Food from Small Spaces fills the gap as a practical, comprehensive, and downright fun guide to growing food in small spaces. It provides readers with the knowledge and skills necessary to produce their own fresh vegetables, mushrooms, sprouts, and fermented foods as well as to raise bees and chickens — all without reliance on energy-intensive systems like indoor lighting and hydroponics. Readers will learn how to transform their balconies and windowsills into productive vegetable gardens, their countertops and storage lockers into commercial-quality sprout and mushroom farms, and their outside nooks and crannies into whatever they can imagine, including sustainable nurseries for honeybees and chickens. Free space for the city gardener might be no more than a cramped patio, balcony, rooftop, windowsill, hanging rafter, dark cabinet, garage, or storage area, but no space is too small or too dark to raise food.
The above excerpt is from R.J. Ruppenthal’s Fresh Food from Small Spaces: The Square-Inch Gardener’s Guide to Year-Round Growing, Fermenting, and Sprouting (Chelsea Green Publishing, 2008) and is reprinted with permission from the publisher.


